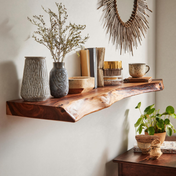

Budget Friendly Tree Branch Bookshelf Ideas for Everyone
If you love rustic charm and want a low-cost way to add personality to your home, a tree branch bookshelf is a beautiful, eco-friendly option. This guide covers planning, materials, step-by-step building, safety, styling, costs, and maintenance so you can create sturdy shelving without breaking the bank.

Why Choose a Tree Branch Bookshelf?
A tree branch bookshelf blends natural aesthetics with custom functionality. Benefits include:
- Low cost: many branches are free or inexpensive to source.
- Unique style: no two branches are the same, giving your shelves character.
- Custom sizing: fit shelves into odd spaces or scale to ceiling height.
- Sustainability: use reclaimed or fallen wood to reduce waste.
Planning Your Project
Start with a short design phase to avoid wasted time and materials. Consider these questions:
- Where will the tree branch bookshelf go? (wall, corner, freestanding)
- How much weight do you need it to hold? (books are heavy)
- What length and orientation of branch works with your space?
- Do you want fixed shelves or adjustable ones?
Sketch a simple plan: overall height, shelf widths, spacing between shelves. Label where supports and wall fasteners will be located.
Materials and Tools
Most builds use inexpensive materials—branches may be free.
Materials
- Sturdy branches (or small trunks) for uprights or brackets
- Plywood or reclaimed wood for shelves (3/4" recommended for books)
- Screws, wood glue, brackets, and wall anchors
- Wood filler or epoxy for cracks
- Finish: tung oil, varnish, or water-based polyurethane
Tools
- Drill and bits
- Saw (hand saw or circular saw)
- Sander or sandpaper (80–220 grit)
- Level and tape measure
- Clamps and a workbench or sawhorses
- Optional: pocket hole jig, router, epoxy mixing tools
Choosing and Preparing Branches
Choosing the right branches is crucial for strength and longevity.

- Species: hardwoods (oak, maple, ash) are stronger than softwoods but either can work with proper supports.
- Diameter: uprights should be at least 2½–3" diameter for moderate loads; thicker is better.
- Condition: use sound, dry wood with minimal rot. Avoid branches with active insect infestation.
- Sourcing: fallen branches from your yard, reclaimed wood yards, or classified listings.
Preparation steps:
- Remove loosened bark and clean with a stiff brush.
- Air-dry branches for several weeks if newly cut. Thin branches may dry quicker; large pieces need more time to avoid cracking.
- Treat pests: a light borate solution will deter insects if needed.
- Sand ends and contact points for flush fits with shelves and brackets.
- Fill large cracks with clear epoxy to stabilize splits.
Design Variations
Popular designs include:
- Vertical upright branches: branches act as the spines holding horizontal shelves.
- Bracket-style branches: branches used as decorative brackets with standard shelf boards.
- Corner tree bookshelf: two branches meet in a corner with stacked shelves.
- Freestanding ladder shelf: branches as side rails with supported treads—needs strong base.
Step-by-Step: Build a Simple Wall-Mounted Tree Branch Bookshelf
This straightforward build uses two upright branches and three shelves.
- Measure and cut shelves: choose lengths that fit between uprights with 1/2" clearance each side.
- Position uprights: mark wall studs and place uprights so they align with studs or use heavy-duty anchors.
- Attach shelf cleats to uprights: screw a small cleat into each upright where a shelf will sit. Cleats can be hidden under the shelf for a floating look.
- Pre-drill shelf holes: countersink holes if screwing up into shelf from below.
- Fix shelves in place: use wood glue plus screws driven from cleats into shelf bottom, or mount brackets behind shelf for added support.
- Secure to wall studs: anchor the uprights with long lag screws into studs or use heavy toggles for masonry walls.
- Finish: sand all exposed wood and apply two coats of finish for durability.
Load and Safety Guidelines
Books are heavy. A practical rule of thumb:
- A well-supported 3/4" plywood shelf spanning 30" can hold 40–60 lbs when properly attached to studs or robust uprights.
- If you plan to store many heavy books, add a rear cleat screwed into studs or incorporate angled brackets beneath each shelf.
- Always fasten uprights to wall studs with structural lag bolts when possible. For freestanding units, add a wide base or wall straps to prevent tipping.
- If in doubt about load-bearing walls or heavy loads, consult a contractor or structural engineer.
Cost Estimates
Typical budget ranges:

- DIY low-cost: $10–$60 — branches found free, a few screws, and basic shelving board.
- Mid-range: $60–$200 — purchased hardwood boards, quality finishes, brackets, and new tools.
- Higher-end: $200+ — custom-cut lumber, professional fasteners, and designer finishes.
Tip: Check reclaimed lumber yards and online classifieds for cheap shelving boards and brackets.
Finishing and Styling Tips
Finishes protect the wood and enhance the look:
- Oil finishes (tung or linseed) penetrate and keep a natural matte look.
- Water-based poly provides durable, low-odor protection and dries fast.
- Clear epoxy on branch tops gives a glossy, sculptural look and seals cracks.
Styling ideas:
- Combine live-edge shelves with raw branches for a modern rustic vibe.
- Mix materials—metal brackets with wooden branches for contrast.
- Keep heavy books on lower shelves; use upper shelves for decor and lighter items.
Maintenance
Maintain your tree branch bookshelf by dusting regularly and checking fasteners annually. If small cracks appear, reapply epoxy or wood filler and re-seal the area. Re-tighten screws and wall anchors after seasonal humidity changes.
Troubleshooting
- Warped shelves: add a central support or switch to thicker plywood.
- Squeaky joints: apply wax or wood glue and re-clamp while drying.
- Loose uprights: add additional lag screws into studs or use metal brackets at top and bottom for reinforcement.
Frequently Asked Questions
Can I use green (freshly cut) branches?
Freshly cut wood contains moisture and will likely warp or crack as it dries. Air-dry branches for weeks or kiln-dry them before installing. If you must use green wood, allow for movement and add extra support.

Are tree branches safe indoors?
Yes, when properly cleaned, dried, and treated for pests. Sealing with a quality finish will lock in resins and block insect entry.
How do I prevent the shelf from tipping?
Anchor the unit to wall studs with straps or brackets, lower the center of gravity by placing heavy items low, or add a weighted base for freestanding pieces.
Conclusion
A tree branch bookshelf is a budget-friendly, creative way to add natural beauty and functional storage to your home. With simple materials, careful planning, and basic tools you can build a safe, stylish shelving unit tailored to your space. Start small, experiment with finishes, and customize bracket and shelf sizes to match your needs—your unique tree bookshelf will be both a conversation piece and practical storage.
Ready to build? Gather a few sturdy branches, sketch your layout, and follow the step-by-step guide to craft a tree branch bookshelf that fits your style and budget.